Showing posts with label Copics. Show all posts

She Passed!

Friday, 16 October 2015

Hello Folks!

Another 4 weeks have been and gone in a flash!  The year will soon be away and I'm still struggling to remember to write 2015 instead of 2014!
My wee sister passed her driving test last Saturday.  She hadn't told us that she was doing it but I had an inkling :)  She was under pressure to pass it first time as we all passed on our first attempts (all being the siblings - there are 4 of us altogether, including Rachael).  She managed it so was quite excited and very happy!  She then drove her car up to Belfast on Sunday to Queens, where she goes to university.  She wasn't overly confident as it's a good bit away and involves motorway and lanes and round-abouts and lots of traffic - and she only passed her test the day before!  It also involves knowing the way, so mummy went with her, with daddy following to take mummy home again!  We'll see how she manages on the homeward journey.

We have another challenge for you this fortnight at the Alphabet Challenge Blog, and it was my turn to choose the theme, so I went for...

R for Ribbon!

I want to see lots of lovely ribbon on your makes, I'd really like to see some innovative ways of using ribbon, as well as beautiful bows and showing off pretty ones.

As I had a special occasion for a card this week, I had a specific theme, here's what I did:


I made this for Rachael and I started off by googling a map of our local area which I took a screen-shot of and turned it sepia in photoshop.  The other papers I used are American Crafts, Lucky Charm.


The image is Keys Please by Saturated Canary.  I coloured her with the following copics: Skin;E21,13,00,0000,R20. Hair;E4937,33,30. Top;Y26,23,21. Trousers;E29,27,25,23. Boots;RV34,32,21,10. Eyes;YG17,13. Certificate;E40.


The dies I used are: Die-Namics - Dainty Doily Duo (the small one), Magnolia swirl Doohickey, Memory Box - Simple Banner and Marianne Design die and matching stamp for the sentiment.
The flower is from The Works and the ribbons and charms are from my stash.

The inside is kept fairly simple and echoes the front.  I used another map of the local area which also got the sepia treatment.

So there you have it, I hope you can join us at the Alphabet Challenge Blog and show us what you can do with ribbon!

Thanks for looking!
 Photobucket

Handbags & Gladrags

Friday, 29 May 2015

 Hi lovelies!

There's a bit of golf fever spreading around over here!  The Irish Open is currently taking place in Newcastle, Co. Down (only a few miles up the road from me) and there has been so much buzz and excitement about it!  I'm not really into golf myself, but I'm enjoying the craic about it.  My cousin's wee boy was very excited to get Rory McIlroy's autograph the other day and there are photo's popping up all over Facebook of local people with the rich and famous!  Unfortunately the weather isn't playing ball (or golf!) as there have been a few showers, but it brightens up in between the showers, so hopefully people get a chance to dry off then.  It may be affecting the local hero though as Rory hasn't been playing so well, hopefully he will pick up a bit today as it would be good to see him compete.

I'm still trying to get the hang of being back at crafting and blogging again!  I've been trying to make changes to my craft room but there is so much stuff and it's only a small room, so it's a challenge!  I am going to get a bookcase to put on top of an existing bookcase to try to make more storage space.  I need a bigger house!!  Mostly so I can fit all my craft stuff in!
I bought a load of gorgeous fabric to make some aprons a while back but haven't gotten around to them yet as I don't have the space to lay out the fabric!  I'll figure something out though.

We have a new challenge today at the Alphabet Challenge Blog.  We're up to H again and the challenge for the next fortnight is...

H for Hats and/or Handbags

Here's what I did


This is actually a twisted easel card, here it is opened up


I knew the exact stamp I wanted to use for this one - it's one of the first stamps I ever bought and it was perfect for this challenge!  She is Dressing Up Maggie by Sugar Nellie and I coloured her with the following copics: Skin; E21,13,00,0000,R20,RV23. Dress; R39,29,RV29,25. Hat; RV29,25,23. Boa & Hat; B39,37,34. Beads & Gloves; 100,C9,6.  I also used a black prisma pencil and a graphik "snow" line painter to help with shading and highlights.


I used papers from the Rosarian pad by Prima along with cream and black card.  I love easel cards and twisted easel cards but I really love the shape of this one.  To shape it I used an XL circle die by Go Kreate, the largest one in the set, and hooked it over one corner of the card and passed it through my Grand Callibur.  It can be a little messy looking so the ribbon helps to hide the sins!


I used Spellbinder ovals and scalloped ovals as well as a border punch by Martha Stewart.  The sentiment was cut using the Alice & the Centurion alpha dies by X-Cut.  For the stopper I pulled the stalk out of an old earring and glued the base into place.  A wee tip - when I cut the edges of the ric-rac (which I did after the layers were stuck down, so couldn't tuck the ends in under) I applied some clear nail varnish to help avoid fraying.


A few diamantés here and there always finishes everything off nicely - that's my motto for life! lol!


 And that's my card, I do hope you can join us this fortnight at the Alphabet Challenge Blog, I'll keep an eye out for you there!


Thanks for looking!
 Photobucket

Wedded Bliss

Sunday, 7 April 2013

Hi everyone!

I hope you're all well?  It has warmed up a lot here since my last post and almost all the snow from around my house has gone, but there's still a lot over the Mourne Mountains a few miles away.  Lot's of people are enjoying it by going up and skiing etc, but I'm afraid that's not for me!
Apparently there has even been an avalanche!  I've never heard of there being an avalanche in our wee mountains before and luckily no-one was near it.

Time for another Pink challenge at Eclectic Ellapu and it's our lovely Claire's turn to host.  The challenge she has chosen for the next week is...

Wedding, Engagement or Anniversary!

A fab challenge for this time of year as there are always so many weddings taking place!

Speaking of which, my card was made for my cousin and his lovely bride who got married last week on Easter Monday!  Of course we all wondered up until the bitter end if it was all an elaborate April Fool, but so far, it seems legit!  Lol!


I made an Easel card


My most-used-ever stamp is You & Me Baby by Tiddlyinks.  I adjusted the print colour to sepia before I printed it and coloured it with the following copics:  Skin: E21,13,00,0000,R20. Hair and clothing: E39,37,35,33,31,30,29,R39,07,Blender.


I printed the sentiments along with the image by adding them on Powerpoint.  I also printed the names onto corresponding card.  The corner swirly stamp is a mixture of two - the bigger one is a LOTV clear stamp and the smaller one is by Magnolia.  The die is Decorative Labels 8 from Spellbinders.
I don't know the manufacturer of the paper as it is a really old one from my stash and there was no name on it.  The pearls and lace are from my stash and I distressed everything (including the lace) with Walnut Stain and Vintage Photo distress inks.


I added a place to write your greeting under the easel with a computer generated sentiment.  The sentiment on the mini tag is from Wild Rose Studio.  I also added a little pocket for a gift to be enclosed.


So go take a look at the fab inspiration from the rest of the DT at Eclectic Ellapu!

I'd like to enter my card in the following challenges:

By The Cute & Girly; Vintage
Delicious Doodles Challenge: More than 1 fold
Papercrafting Journey; Monochromatic
Stamp & Create Challenge; Use at least 1 die cut
Tuesday Alchemy; Over the pastel rainbow
Tiddlyinks Challenge; Distress

Thanks for looking!
 Photobucket

Daft For Daffodils (Plus A Tutorial!)

Friday, 29 March 2013

Hi Everyone!

I hope you're all keeping warm, I think this is the first day since last Thursday that it hasn't snowed (although it's early yet!)  I can't believe how much snow there has been - this was taken (not by me!) on Wednesday just up the road a bit:


Thankfully I wasn't too badly affected and we were able to celebrate my mum's 60th birthday on Wednesday night.

It's time for a new challenge at the Alphabet Challenge Blog and it's the last challenge for our lovely boss and leader Lesley :(  She's stepping down so she'll have more precious time for her.  But fear not!  The fabulous Shaz is taking over and I'm sure we'll be in safe hands!
Our lovely Caz had the task of choosing the challenge for the next fortnight and she chose...

D for Daffodils!

A lovely challenge, especially for this time of year, although our daffodils are buried under the snow!

Here's what I did:


I used this image not too long ago but I had to use her again for this challenge as she's just perfect!  She's called Flower Power Daffy by Digital Delights and I coloured her (slightly differently this time!) with the following copics:  Skin; E21,13,00,0000,R20. Hair; E77,59,57,55,53. Clothes; YG97,95,93,91,YR07,04,02,00.  Daffodils; Y19,17,15,13,11,G24,21,20.


The papers are Cosmo Cricket, Salt Air, but I thought the mermaid tails looked like daffodil leaves!
I cut the image out with a Spellbinder oval die and matted on a scalloped one.  The sentiment is by Pink Gem Designs and cut out with an X-cut die.  The little green pearls are from my stash and the lace is from The Ribbon Girl.


 The inside is done to match the front.


I also made a box to put the card into, so here's the set;


I was asked by one of my teamies to show how I made my daffodils, so here's a little tutorial.


First of all you need to make some small rolled roses by cutting out some circles (roughly 5 or 6cm diameter) and then cut them into a spiral.  I don't have any of the fancy dies for this so mine are all roughly cut, by hand (and scissors!).


Then, using a pair of tweezers, starting from the outside end of the spiral and curl around the tweezers.  I find if you curl it quite tightly to start with you can loosen it and it will keep a nice shape.  You need to loosen it a bit to remove the tweezers and then you can play with it to get the shape you want.  If I'm making roses, I will keep it quite tightly rolled, but for the daffodils I loosen it up a lot to keep the centre nice and open.


A good blob of glue will keep it nicely in place.  You only need to hold the paper together for a little while until the glue sets a bit, you don't need to hold it until it's completely dry - or this would take forever!


Once you've rolled the roses (or daffodil centres in this case!) you need to make some stamens.  I took a scrap of orange card and cut a thin strip - a couple of mm's wide and about 4cm long.  Fold it in half and then I grabbed an end with my tweezers and curled it around, removed the tweezers and squeezed between my fingers to make a wee curly nodule at the end.  Then simply push the folded end down into the glue in the centre of the roses (or if you haven't used as much glue as me, or it has dried a bit, add more glue down into the flower).  Leave to one side to dry.


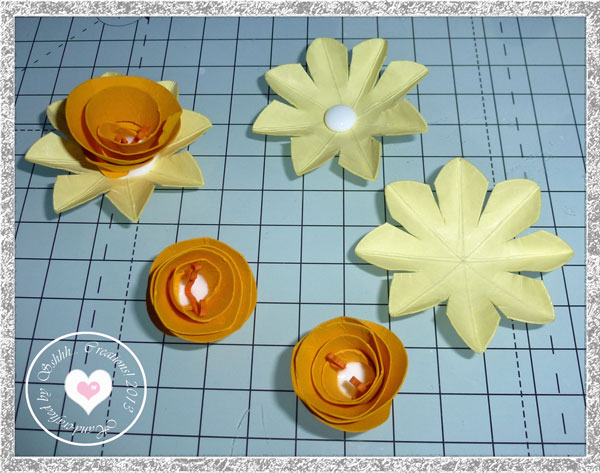
For the next step I used a Spellbinder Dahlia die and used the third from smallest die to cut the outer part of the daffodil.  I then scored the die-cut from point to point (using a ruler and a scoring tool) and then folded along the score lines.  I then snipped in the valley between the score lines - to about half way from the outer edge to the centre.


Then, using a large ball tool and a cushioned  mat (mine is a promotional coaster someone left into work one time and it has a cushioned underneath!  Perfect for this as it's quite firm) I shaped each petal by running the ball around the edges of each one, using a fair amount of pressure.  After I did each petal I ran the ball in a large circle in the centre part to give the flower a better shape.  Lastly, for this stage, I nipped each petal closed along the fold line.


Nearly there now!
Using a good blob of glue, place the rolled roses into the middle of the petals.
Leave to dry for a few minutes.


Using another scrap, I cut (with my trimmer) some stems and leaves - the stems are about 4mm wide (and as long as you want) and the leaves start off at about 4mm wide and taper down to nothing.


Tip your flower up-side-down (making sure the glue has dried enough that it won't drip) and add a little drop to the back and attach one of your stems.
I'm adding my flowers to a card so I did the stems like this as it is flat and light-weight.  Another option that I think would be nice would be to paint a skewer green and attach it with a little bit of tan paper over the top of the skewer on the back of the flower, these would then be more sturdy and could be used on a different project!


Once all the glue has dried you can arrange your leaves and flowers on your project (make sure to put glue on the back of the flower head when attaching to your card as they are quite heavy) and trim the stems to length.
Here's my card again with my arrangement on it.


Phew!  That was a bit of a marathon!
If you give it a go, I'd love to see you enter the challenge at the Alphabet Challenge Blog!  Pop over and see what the rest of the DT have done too!

I'd like to enter my card in the following challenges:

Bunny Zoe's Challenge: Girly
Charisma Cardz Challenges; Happy Birthday
Digital Tuesday Challenge; Spring Colours
Fab N Funky Challenges; Boxed in
Forever Friends Fortnightly Challenge; Girls
Fussy & Fancy Challenge; Spring days
Kaboodle Doodles; Spring
Papercrafting Journey; Ribbon or lace
Scrappy Frogs Challenge; Luck O' The Irish
Sweetpea Stampers; Spring colours

Thanks for looking!
 Photobucket

Caught A Bug

Sunday, 24 March 2013

Hi everyone!

Happy spring!  Although it doesn't look like it!  It's been snowing steadily for 3 days, but we seem to be getting a break from it today, hopefully it'll stay away - my mum is celebrating a big birthday on Wednesday and we'd need to be able to get there to help her celebrate!
We've been dealing with a combination of heavy snow and wind, and flooding, but I live at the top of a hill so I think I'm getting the better end of the bargain and am just snowed in!  There has hardly been a road open all through the countryside and the electric has been playing up too.  Who'd've thought it at this time of year?!  This time last year Ireland was having a heat wave - I remember cos I missed it - I was in Australia at the time.  After the heat wave, it started raining in April and hasn't stopped since, unless you count it turning to snow instead!
Hopefully we'll get a summer this year.

But enough of my weather rant!  Time for another challenge for the Pink team at Eclectic Ellapu!
Berni's turn to host this week and the fab theme she chose for this week is...

April Fools - anything whisy or funny!

See, didn't I tell you, fab challenge!!  Can't wait to see what everyone comes up with this week - I need a good laugh!

Here's what I did:


I made a pop-up card!


The image is "Caught A Bug" by Whipper Snapper Designs and I coloured it with the following copics: B12,0000, YG17,13,11 YR07,04,02, E57,55,53,51, Blender.


The papers are Basic Grey "Lime Rickey" and I used a Magnoila tag die for the computer generated sentiment - I thought the name of the stamp said it all!  Ribbons, charms and pearls are all from my stash (which basically means that I can't remember where I got them!).

Here's the card flat so it fits in an envelope:


So go and take a peek at what the rest of the DT have come up with at Eclectic Ellapu - you're sure to have a laugh!

I'd like to enter my card in the following challenges:

Charisma Cardz Challenges; Die cuts
Craft Your Passion Challenge; Ribbon or lace
Creative Belli Blog; St. Patrick/Green
Delightful Challenges; Get Well cards
My Heart Pieces; Not be square
One Stop Craft Challenges; Recipe
Scrappy Frogs Challenge Blog; Luck O The Irish (Green)
Top Tip Tuesday; ROFL

Thanks for looking!
 Photobucket

A - B - C

Friday, 15 March 2013

Afternoon everyone!

Are you all ready for Paddy's day?!  Only another couple of days - and we get a day off work so woohoo!

And the F1 season officially started last night with the first practice sessions in Melbourne - I can't believe it's a whole year since I was there!  I remember at the Friday practice we got totally soaked!  I still feel like it was yesterday, even though so much has happened in the year since.

Anyway, time for another challenge at the Alphabet Challenge Blog and it was our lovely  Roxx's turn to choose the theme and she went for...

C for Coveted!

So all those things that you've been putting away and stroking cos they're too lovely to cut up - it's time to cut them up!

I made mine a while ago, but here's what I did:


The image is Charlotte by Kraftin' Kimmie and I coloured her with the following copics: Skin; E21,13,00,0000,R20. Hair; E37,35,33,29. Dress; R59,39,37,YR16,14,00,100,W9,7,B95,93,91,YG95,93,91. Shading; W5,3,E41,40.


The gorgeous papers are by Prima and they're called Doodle Deux, I love the colours in the book and I don't want to use them all up!
The Dies I've used are Spellbinders Wonky Rectangles and Memory Box Simple banner.
The sentiments are a mixture of computer generated and I the name on the banner is hand written (very brave I think, considering how terrible my writting is!)
The letters and ribbon have been floating around in my stash for ages.


The inside is another page out of the stack and I thought is was so nice that all I added was a LOTV sentiment.


So go and have a look at how brave the rest of the DT were at the Alphabet Challenge Blog and what lovely stash they've used up!

I'd like to enter my card in the following challenges:

Anything Goes Challenge Blog; Seeing double
Bunny Zoe's Craft Challenge; Girly
By The Cute And Girly; Favourite things
Cute Card Thursday; Anything goes
Fab N Funky Challenges; Add a sentiment
No Matter Which Challenges; Anything goes
Papertake Weekly; 1,2,3 - 1 image, 2 ribbons, 3 letter embellishments
Stampin' For The Weekend; Childsplay
Tuesday Alchemy; Anything goes

Thanks for looking!
 Photobucket

Happy Mother's Day...again!

Wednesday, 13 March 2013

Morning everyone!

Has it been cold enough for you over the past few days?  Thankfully we didn't get very much snow this time but it has been so cold!  The sun is out today though so hopefully it'll start to warm up a bit!

I'm here today as I won the challenge at delightful challenges a few weeks ago (and all the better cos they choose the winners rather than a random pick) and I was asked to be a guest designer on their Digital Delights blog!  Of course I said I would!  They very kindly let me pick an image and a sentiment from their fab selection and this is what I did:


The image is Flower Power Daffy.  I reduced the opacity on the image before I printed it to have another go at the no-lines technique and I coloured her with the following copics: Skin; E21,13,00,0000,R20. Hair; YR09,07,04. Clothes; Y17,15,13,00,YG13,11.  And Dark brown, Crimson red and Black Prisma pencils.


The papers are Pink Petticoat gingham.  I used Spellbinders eyelet squares for the mat and I threaded some ribbon through the holes.  I hauled out my sewing machine and stitched around the edges of each mat - I also took the opportunity to turn up some jeans that I've being meaning to do for ages!  I made some rolled roses out of the yellow card and the gingham paper - I cut the spiral myself as I don't have any dies for that.  My favourite Magnolia swirl die has made an appearance again and the ribbons are from my stash.  I coloured the sentiment with some of the same copics I used on the image and then blinged it up with a glittery pen.


The inside with more of the same as the front.


I also made a box to put the card into - as the rolled roses make the card a little too big for an envelope.  Here's a picture of the card with the box.


I attached magnets in the ends of the ribbon as a closure and then added some more roses to cover it - one of the roses acts as the opening.  Here's a picture of the box opened.


I'd like to enter my card in the following challenges:

Bunny Zoe Crafts Challenge: Girly
Crafts 4 Eternity; Marvellous Mums
Crafty Catz; All stitched up
Delicious Doodles Challenges; Use die cuts
Dream Valley Challenges; Mother's day
Fab N Funky Challenges; Add a sentiment
Forever Friends Monthly Challenge; Lot's of flowers
Joanna Sheen Challenge Blog; Mum's the word
Stamptacular Sunday Challenge; To die for
Whimsy Stamps Inspirations Challenges; Stitch it

Thanks for looking!
 Photobucket