Rock Out At A Christening!

Friday 24 July 2015

 Hi everyone, I hope!

I'm off on holidays at the moment and I thought I wasn't going to be able to get this posted as my internet/computer are doing my head in!  I'm not sure what the problem is but most of the time, when I log on, the browser won't open any pages for me.  The computer seems to be doing updates and things OK so I don't know what the problem is.  I tried 3 different browsers and they were all the same.  I had just about given up but decided to check one more time and it seems to be working now.  Typical when it's now 11:30pm, I'm heading off first thing in the morning, and I still need to pack!
So, owing to that, this scheduled post is going to be short and sweet!

We have a new challenge at the Alphabet Challenge Blog today and it is...

L for Lavender!

What do you do when your Rocker brother is having his son christened?  You make a Metallica themed Christening card of course!  Here's what I did:


I actually made this card a while back and for the life of me, I don't know what I did with the details for it, but I suppose that's a good thing as I haven't got time to write them out now! lol!
I know the image is by Mo's Digital Pencil and I coloured him with copics.

The papers are by Pink Petticoat, again, I'm not sure which colour pack they're from.  They look kinda blue til you see the blue guitar beside it, then they look kinda lavender!  I think they look blue-er in the photo's too :/
I used a selection of Spellbinder dies and some fonts that I got for free from the net.  I particularly like the Metallica font that I used to spell Noah!  I added a little cross cos it's a christening card, ie: it's holy and also in homage to the Master Of Puppets album by Metallica!


The inside just features some of the same papers as the front and a LOTV sentiment stamp.


That's my card, I hope you liked it!  I hope you can join us at the Alphabet Challenge Blog for this challenge sometime in the next couple of weeks!

Thanks for looking!
 Photobucket

He Liked It So He Put A Ring On It!

Thursday 2 July 2015

 Hi everyone!

I've had to redo my post as it was scheduled to go last Friday, it didn't happen and when I tried to fix it I somehow managed to delete it :(  I think I'm out of practice with Blogger!
I'm also running out of patience tonight!  I think I'm too hot, even if I am in Ireland!
I've been having a lot of trouble getting online over the past number of weeks (which isn't helping with the patience!) so I apologies for being a bit behind on my commenting - I will get caught up!

We started a new challenge at The Alphabet Challenge Blog (when this post was originally supposed to go live!) and it still has a week to run.  We're up to J and the challenge is...

J for Jewels

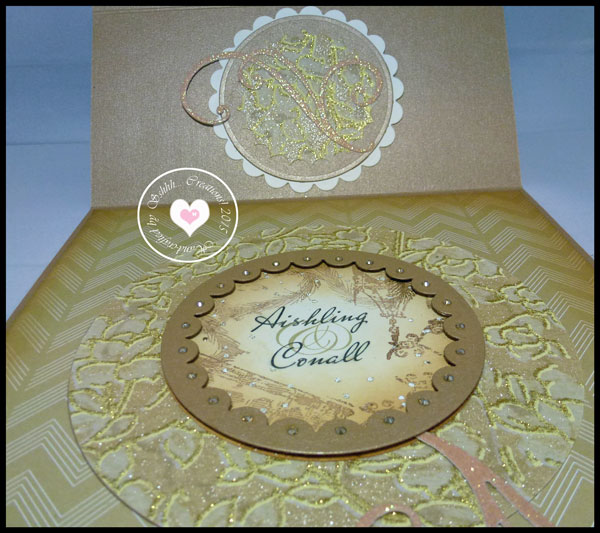
I made this card for my cousin when she got engaged - this is the couple I went to Australia with in 2012, they were just a brand new couple then!  So I wanted to make a special card for them to celebrate.  Here's what I did...


This is a large easel card at 8x8 inches.  I always find it hard to fill in the spaces on larger cards. I think it looks a bit bare in the photos, but it somehow looked better in real life.


I've lost my wee info sheet of what I used but I'll try to remember.  I used 2 of my Go Kreate XL circle dies to make the "ring" and I deliberately put the smaller one off centre to give an illusion of depth.  I used papers from a 12x12 American Crafts paper pad called Lucky Charm which I inked around and stamped with some accents stamps (sorry, I don't know who makes them) I also sprinkled some frantage powder over it before heating it up.  The base is covered with a paper that I had for forever and have no idea where it came from!  It is almost like fabric and has lots of glitter and texture on it.  The sentiment is computer generated using the font named Take A Pebble.  I then added a Doohickey swirl cut from peach glitter card.


 For the Jewels I used 3 Bevelled Window Panes from Stampin Up, 2 small and 1 large.  On the 2 smaller ones, I coated the under-side with glossy accents and then applied the fabric like paper and left to dry fully.  For the larger one I measured the dimension inside the bevelled part and printed out a photo of the happy couple - actually taken on the night they got engaged and used to announce the news! - to the same size.  I stuck it to the middle of the pane before adding the fabric paper and leaving to dry.  Once dry I then trimmed the excess paper from the edges and arranged on the card Ring base to (hopefully) resemble an engagement ring!  It was mighty hard, in fact impossible!, to get a good photo of the jewels.


The base was made using the same dies as before plus a Spellbinders circle die and an inverted scalloped circle die, raised on foam pads to act as the stopper for the easel.  The same font as before was used for the computer generated sentiment and lots and lots of gems were added.


I also added a small pocket to the inside where a gift could be inserted.


I was actually away over the weekend at Aishling's hen party, a merry night was had by everyone!

That's my card, I do hope you can join us at the Alphabet Challenge Blog for the rest of the challenge.

I'd like to enter my card in the following challenges:

Create & Inspire: Anything Goes
Craft Your Passion: Anything Goes
Creative Fingers: Anything Goes
Creative Inspirations: Anything Goes + Sketch
Fussy & Fancy: Fancy folds
ABC Challenges: M for Magnolia - Magnolia swirl die used
Corrosive Challenges: Leave a little sparkle

Thanks for looking!
 Photobucket