Christmas Cutie!

Tuesday 29 July 2014

 Hi everyone!

I hope you're all well today?
I have been kept busy at work, this is a particularly busy week for me but it's OK, next week will be quieter.  I've been doing the 5-2 diet and today is one of my fasting days so it's good to be kept busy and then I don't notice that I'm hungry! lol!

We have a new challenge up today at the Creative Card Crew.
Our sponsor for this fortnight is Whiff Of Joy

http://www.whiffofjoy.ch/
 They are offering a rubber stamp to one lucky winner!

The challenge we have for you this time is a scary one!  We want you to make items with a theme of...

Christmas!

It scares me anyway!  It seems like no time at all since last Christmas and there's less time til next Christmas than there has been since the last!

But I knuckled down and this is what I did..


The image is Harry Hugging A Christmas Bauble by Whiff of Joy.  I coloured him with the following copics: E29,27,25,23,21,13,00,0000. R59,39,37,24. YG07,05,03. N5,3. Blender.  I used a metallic gold gellyroll pen on the hanger and other um, gold bits!
Again, I wasn't overly happy with my colouring on this one, I guess I just need to get back to practising again!


The papers are Helz Cuppleditch "Santa's Workshop" by Trimcraft.  The sentiment is also by Whiff of Joy from the Seasons Greetings set.  The ribbon came from Next and the kraft card, tag, pearls and button are from my stash.  The string on the tag is reused after I kept it from some clothes tags.  I used Spellbinders circle and scalloped circle to cut out the image.


The inside is much of the same with another sentiment from the same stamp set.


Please take a look at what the rest of the DT have done over at the Creative Card Crew blog and have a go at entering too!

I'd like to enter my card in the following challenges:

Bearly Mine Challenges; Lets go digital
Crafty Ribbons; Anything goes with ribbon
Creative Fingers Challenge Blog; Anything goes
Delightful Challenges; Add ribbon
My Time To Craft; Use kraft
Sentimental Sundays; Christmas in July
Southern Girls Challenge Blog; Christmas is a coming
The Corrosive Challenge Blog; Christmas in July

Thanks for looking!
 Photobucket

Slightly Steampunk

Hi everyone!

It's been tough going for the past week or so, with the heat!  I don't know how people who live in hot countries cope every year!!  Thank God the last couple of nights have been a teensy bit cooler and I've been able to sleep a bit.  That's 2 years in a row that we've actually had a bit of a summer, even if they were only short ones! lol!

We have a new challenge up today on Seems A Little Sketchy and we have a fab sponsor in Teri at Delicious Doodles!

http://deliciousdoodles.blogspot.co.uk/
Teri is offering 4 digi's as a prize to our lucky winner!

The sketch for you for this fortnight is...

http://seemsalittlesketchy.blogspot.co.uk/

A nice simple one for you, but it's amazing what some people can do with just a few elements!

Here's what I did..


The fab image 'Steampunk Mermaid' was provided by our sponsor Delicious Doodles and I coloured her with the following copics: Skin;E21,13,00,0000,R20. Hair;E49,39,R39,YR24,23. Tail etc.;E37,35,33,29,27,25,23,09,08,07,04. Rock;BV04,W5. Eyes;YG23. Sky;BV0000,RV10,blender. Sea;YR02,RV11
I wasn't entirely happy with my colouring on this one but considering it is the first thing I've coloured in well over 3 months I suppose I can tolerate it!


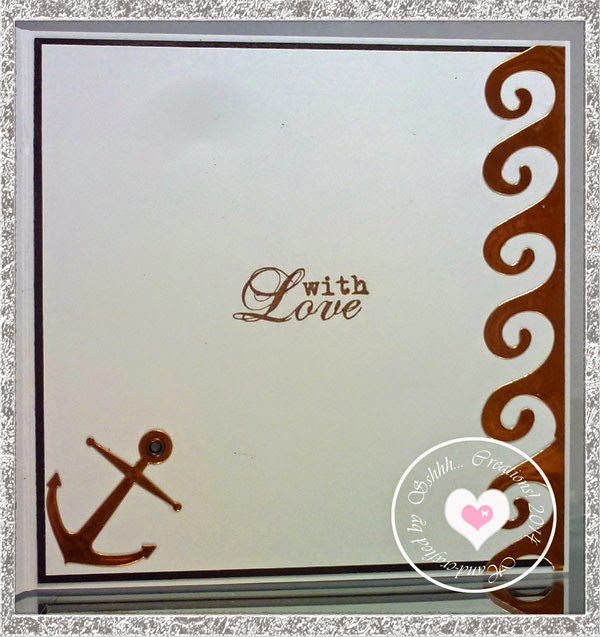
I used my new wavy die from volume one of the Doohickey Club Magazine to cut waves out of a sheet of copper - a proper metal copper sheet!  I've had this for years but was afraid to use it.  I added some different metal eyelets along the edge and in the corner with my crop-a-dile.  I cut out 3 little strips of the copper and ran it through my paper crimper which worked a treat on it as it is so thin!


For the inside, I used the waste from cutting the wave for the front and I also cut a Memory Box Majestic Anchor from the copper sheet, attaching it with glossy accents and an eyelet.
The sentiment is by Whimsy Stamps from the Film Strip Sentiments set.


I do hope you can join us at some point in the next two weeks over at Seems A Little Sketchy, go check out what the rest of the DT have done for more inspiration!

I'd like to enter my card in the following challenges:

A Step In The Dark; Anything goes/Use some metal
Bearly Mine Challenges; Lets go digital
Delicious Doodles Challenges; Anything goes with DD image
Eureka Stamps; Swimming
Left Of Centre Challenges; Black & White plus one - Copper
QKR Stampede; Swimming
The Sisterhood Of Crafters; Die Cuts

Thanks for looking!
 Photobucket

Anniversary Overload!

Monday 28 July 2014

Hi everyone!

Uh-oh!  It seems my blogging skills have gone a little rusty since I've had my hiatus, I thought I had this post scheduled but I must've hit save instead of publish and the flipping thing has been sitting in draft all this time!  It should've posted last weekend!  Sorry about that Elaine!

There are two challenges running at the moment on Eclectic Ellapu,
The Pink teams challenge is...

Reis, meaning country, travel, holiday etc.

And the Purple teams challenge is...

Anything goes!

Although I am on the pink team, I decided that for this week I would help out the Purple team (also because I didn't have anything made for the pink challenge!!)

So here is my card that I made for my parents who celebrated their Ruby Wedding Anniversary last month!


I hadn't made anything for so long when I went to make this one that I couldn't face having to colour an image so I went pretty basic.
The wording is computer generated using the font "Cardinal".  I cut out a Spellbinders Fleur De Lis square in red card and then cut the wording to fit it.  The ribbon, buckle, pearls and diamantés are from my stash.


I used my scoreboard to make a pattern on the base which made lining up the square centre-piece so easy!  I used the same techniques on the inside.


We went out for a meal for their anniversary with all the family in a lovely restaurant in Newcastle.  We also had a gorgeous cake made for the occasion which went down a treat!


So make sure to check out the challenges over at Eclectic Ellapu - These challenges will be running for their full 3 weeks but we'll be over-lapping on the 1st August with new ones as we are starting monthly challenges from then!

I would like to enter the card above in the following challenges:

613 Avenue Create; Anything goes/Use a sentiment
Crafty Ribbon Challenge; Anything goes with ribbon
Delightful Challenges; Add ribbon
Fussy & Fancy Challenges; Words
The Sisterhood Of Crafters; Die cuts
ABC Challenges; P is for Pearls


I was having a look through my files and I realised I hadn't blogged the last card I had on EE!


The image is PPear by Birdie Brown but I'm afraid my copic list has long since been tidied away (lost) but it looks like the YG90's.  I haven't a clue what the papers are either!
I've added some bakers twine and googly eyes.  The sentiments are computer generated and the top one "you're a quare pair!" would be a phrase used in Ireland to say that they are a great couple, or words to that effect. Lol!
The inside has been done to match


I'll be back shortly with my post for today for Seems A Little Sketchy

Thanks for looking!
 Photobucket

I'm Back!!!

Friday 18 July 2014

 Hello!  If there's anyone still there??!!

Wow, it's been so long since I have blogged, or even crafted until this week!  There are about 3 long stories about what has been going on, the incredibly short version is that my mum had a knee replacement so I spent 2 or 3 weeks helping out there and I had some treatment on my sore shoulders, which turned out to be a disaster and is still on-going.  So skip a few other chapters and I'm back and hopefully over the next week or 2 I should be properly up and running again (or at least at a leisurely stroll pace!).
I want to add a massive thank you to Mari, Shaz and Elaine for being so lovely and understanding and letting me have some time off from DT duties, it was great to not have to worry about anything.  I have also decided to step down as the leader of PunkYouGirl, but I'm still staying on the DT and the lovely Kay has graciously taken over the reigns and is doing such a fantastic job at breathing new life into the challenge blog, I wish I had've passed it over sooner!

I meant to do a post showing pics from when I was on the set of Game of Thrones - I wanted to do that after "our" scenes were broadcast, but of course that was aired just at the start of when everything kicked off here so I never got the post done - the series has even finished now!  But I'll still do up the post at some point cos it's too cool not to show off! :P

So anyway, I'm actually here today with something I have made!
It's the midway reminder today at PunkYouGirl and our dark (as always!) theme for this challenge is...

Skeletons and Secrets!

And our new boss Kay is sponsoring us with fab prizes for both 1st and 2nd places!!  Double reasons to get entering!

So I had a good rummage in my stash and found the bits and pieces I needed to decorate a box - to hide your secrets in, see?!


 The box itself was a plain white trinket box that I got in Tesco.  I started by thinking I'd like to use ink to colour it, but after trying and failing several times to open my old pot of ink, I used my pot of black Pebeo paint (which I thought I wasn't going to be able to open either cos all the power had gone out of my hands from trying to open the ink!).  I painted stripes up the sides of the box and lid - I purposely didn't line up the stripes, cos life's just too short!  And the underneath of the box and top of the lid were fully painted black.  I then used my wee old pot of gold ink, which I did manage to get open, and painted over the whole thing with it - it gives it a lovely grubby but shimmery effect.  I then took to attaching some feet to the base with glossy accents.


 The feet and the skeleton have come from a set of Halloween decorations that I bought years ago, I think you're supposed to scatter them over the table.  The foot and lower leg bits were the perfect size to stick to the corners and still leave room for the lid to go on!  They were a bugger to get to stay on though!  I also dirtied up the box sides with some Walnut Stain and Black Soot Distress Inks.


I pulled a page out of an old book (GASP!) that I bought in  a charity shop, (Charles Dickens, Bleak House) and tore it into strips and crumpled, aged, distressed (with inks) and stuck it to the box lid.  I then aged and distressed it a bit more with a sanding block and black and gold embossing powders.  I then attached the "body" with glossy accents.  I coated some round studs in the gold and black EPs and also attached them.


I printed the sentiment (or maybe its the inventory of what's inside the box??!) from the computer using the font Cardinal Alternative, cut out the words, dirtied them up and attached them to each other with some brass jump rings.


So there you go, the perfect box to keep anything you don't want people to find!

Make sure you check out what the rest of the DT have done, I can't wait to see what you do!

I'd like to enter my altered trinket box into the following challenges:

Creative Inspirations; Distressing
Just For Fun Challenge Blog; Anything goes
Crafty Girls Challenges; Anything goes
Creative Fingers Challenge Blog; Anything goes
Creative Moments; Anything goes
A Step In The Dark; Anything goes/Use metal - jump rings & studs
Altered Eclectics; Anything goes

Thanks for looking!
 Photobucket